
A "Busy Bag Swap" is basically where 26 mamas make 26 of one single craft and then swap them with the other mamas making 26 of their craft. Brilliant! So basically you do 26 of the same craft and then walk away with 26 different crafts for your children to enjoy. That is way too many numbers in one sentence.
This past year in homeschooling, having activities for my younger ones to do was (is) a challenge for me. So, I was thrilled when I heard about this opportunity!
We had to do a blog post with directions and information on our projects so I thought I might as well give my untouched blog some lovin' since I did the work to make a blog post and all.
For more of these Busy Bag Projects, head on over to these gal's blogs and look at all of the wonderful projects that were in our Busy Bags.
Kirby's Blog
Chelsea's Blog

Family: I've been happily married to a farmer and the man of my dreams for over 10 years. I've got to give him shout outs on this busy bag project too! Thanks Jason! We have 4 girls: Kaylyn (7), Laney Rae (4), Ruthie (2), and Exie Jo (7 mo). We live on a farm in Brenham, TX.
Our Farm: www.YonderWayFarm.com
Our Family Blog: www.YonderWayFarm.blogspot.com
How do you spend your free time?
I think most of us mommies chuckle at this. In all reality, my free time is devoted to catch up on things I can't do when I DON'T have free time. Is that vague enough for you? Good. I love cooking and experimenting with recipes. I'm a foodie. Dork alert: I love reading natural health books and alternative methods of health treatments. I do love being crafty and creating things although I don't get to do it very often. The beauty of this has been that as my girls have gotten older, I have included them more and more into this aspect of my life. We have fun with that! I also thoroughly enjoy photography.
When you were a child, what was one of your favorite ways to spend your day?
I remember playing school with my sister all of the time.
Fondest memory with your mom as a child?
I loved going garage sailing with my mom on the weekends. She was also so sweet about letting me pick out some 25 cent decoration for my room. I thought I was quite the decorator. It also always seemed as though she had some fun activity for us to go and do.
What does special time with your children look like?
I like to take just one or two of my girls at a time with me on special errands. I have found this to be such a fun way to spend one on one time with them. My girls LOVE to play beauty shop so we are always playing that. We also spend a lot of time in the kitchen together. My older girls are becoming fond of cooking and this makes my heart so happy! As much as I can, I try and include my girls in whatever activity that I am doing around the house.
Favorite outdoor activity with the kids:
We live on a farm, so we are constantly outside doing something together. I guess one of our favorite things to do is collect eggs in the evening with daddy. We pile in the bed of the truck and go driving around the farm at sunset. This is one of my favorite times of day! Another favorite thing we do is school outside on pretty days. We lay out a quilt on the grass and have school there.
A favorite tradition that you want to pass down to your kids:
Whatever the holiday may be, I feel like one area that we are firm in is opening up our home to family and friends and surrounding ourselves with lots of people on holidays. We love having people over and celebrating!
Our family picture.....this is comical. We currently do not have a family picture of ALL of us since our last baby girl was born. So, we had to make do with a snapshot of me on the couch with the girls. My hubby was behind the camera. And I may or may not have just told my 2 year old "Smile, or you'll get a spanking."
Busy Bag Activity:
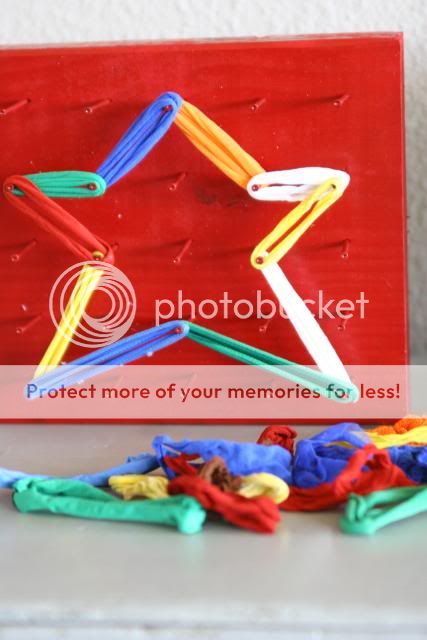
Geoboards are so versitile and can be used a number of ways in teaching a variety of concepts. My 2 year old all the way up to my 7 year old have enjoyed playing with their Geoboards.

You can teach basic geometric shapes using these boards.

These are so fun for my girls to sit and do together. I also find this to be a really easy activity that doesn't require very much assistance from me. And its really sweet to see the older kids teaching the younger ones their shapes on their boards.


Or you can teach your child some of their numbers and letters too on the boards.


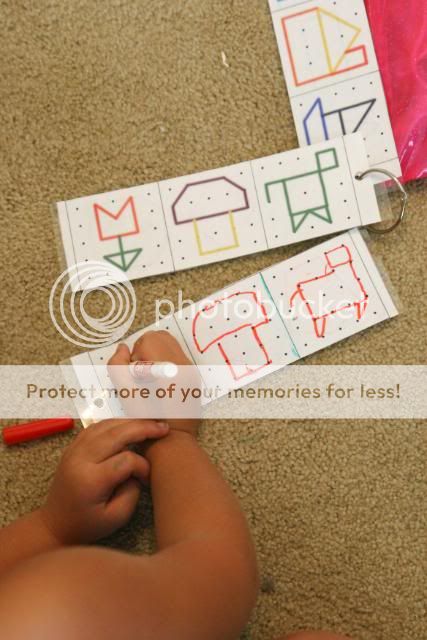
Another thing my girls have enjoyed doing with this project is drawing their shapes directly onto the grid cards as well. This would be a simple thing to throw into a diaper bag or backpack on the go.
Here is how I (mostly my husband) made them:

1. We used a 2x8x10 board. My husband cut them down into 8"x 8" squares. We used 2 boards total to make 26 of them.
2. We measured out a grid (this will depend on the size of board that you use) on cardboard as our template for nailing the nails into the boards. ****Honestly, this was the hardest part of the whole process was figuring out the grid and the measurements for it.
3. My husband graciously nailed in 650 nails into the boards in our grid pattern.
4. We spray painted them after the nails were in. I wanted this look over the unfinished look, but you do NOT have to spray paint them.
5. I designed the grid cards (file below) in photoshop with various shapes. I also included a row of blank grids so that you could free-hand other geometric shapes, numbers, or letters. I used the Bakers Family blog grid template and then designed my own shapes on the cards verses leaving them blank.
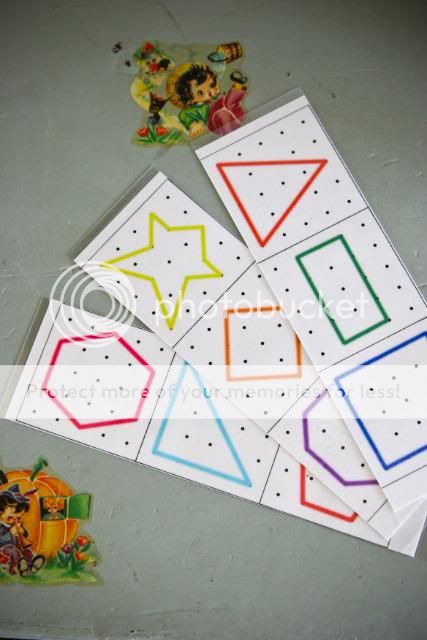
6. Printed them on cardstock at home. I then laminated the 8.5 x 11 sheets of cardstock and cut them into rows.
7. I put these cards on a metal ring along with a pencil bag and the cloth potholder loops and hair rubberbands so it would all stay together. ** The potholder loops were a little lose for the shapes that weren't so spread apart, so I included some hair rubberbands in there as well.
(2) 2x8x10 boards of wood: $12 ($6 each)
(1) large box of nails: $6
(4) cans of spray paint: $12 ($3 each)
(3) large bags of potholder loops from Hobby Lobby: $12 ($4 each) I put a handful of loops in each bag.
(26) metal rings from Walmart: $8 (pkgs of 8@ $1.88 each)
(26) plastic pencil bags: $6.50 (4 bags for $1 at a local dollar store)
***For printing and laminating, I used my own personal printer and my own laminator. I would estimate about $10 for me to do this. However, it will vary if you print them at a copy center or laminate them somewhere else.
Total cost for 26 Geoboards: $56.50 OR $2.17 each.
Downloads:

 facebook
5 comments:
How fun! Your girls sure are growing up!
Blessings,
Amy
love these. making these.
My girls love Geoboards too! We've always used rubberbands, but what a neat idea to use the potholder loops! It seems like they would be much gentler on little hands if they "snap" loose. Thanks for a great idea!
Sounds like fun, and lovely pics!
If that sister-in-law is in town, I sure want to see her, as well as you!!!
Melodi
Post a Comment